

This plan shows you how to teach dog emergency stop—a lifesaving freeze-on-cue. In just 7 minutes a day, pair a whistle or crisp “Stop!” with smart reward placement and simple proofing so the behavior holds up in parks, streets, and surprise moments.
Teach dog emergency stop and you unlock the safest freedom: your dog enjoys space while you keep instant control. Below is a calm, step-by-step plan using rewards (no harsh tools), a whistle, and a hand signal—then real-world proofing for streets, parks, and pop-up distractions.
What Exactly Is an Emergency Stop?
An emergency stop means “freeze where you are and hold position until released.” It’s different from recall (come) and different from heel (come to me and stay with me). We’ll condition one fast, simple cue that your dog can obey even at a distance, even when excited.
- Primary cue: One-blast whistle or crisp verbal “Stop!” (pick one main cue)
- Backup cue: Big palm-out hand signal (visible at distance)
- Reinforcement: Food tosses behind the dog (to stop forward motion) + rapid jackpots for perfect freezes
Safety Setup (2 Minutes)
- Gear: Front-clip harness, 10–15 m long line for early outdoor work, treat pouch, pea-less whistle (optional).
- Surfacing: Start on grass or carpet for traction, then progress to varied surfaces.
- Warm-up: Two treats for name response and one easy “sit” so the learning brain is on.
The 7-Minute Daily Plan (Week 1 Foundations)
Run this micro-session once or twice per day. If your dog flags, stop early—quality over quantity.
Minutes 0–2: Condition the Cue (Stationary)
- Stand 1–2 m from your dog while they’re casually moving.
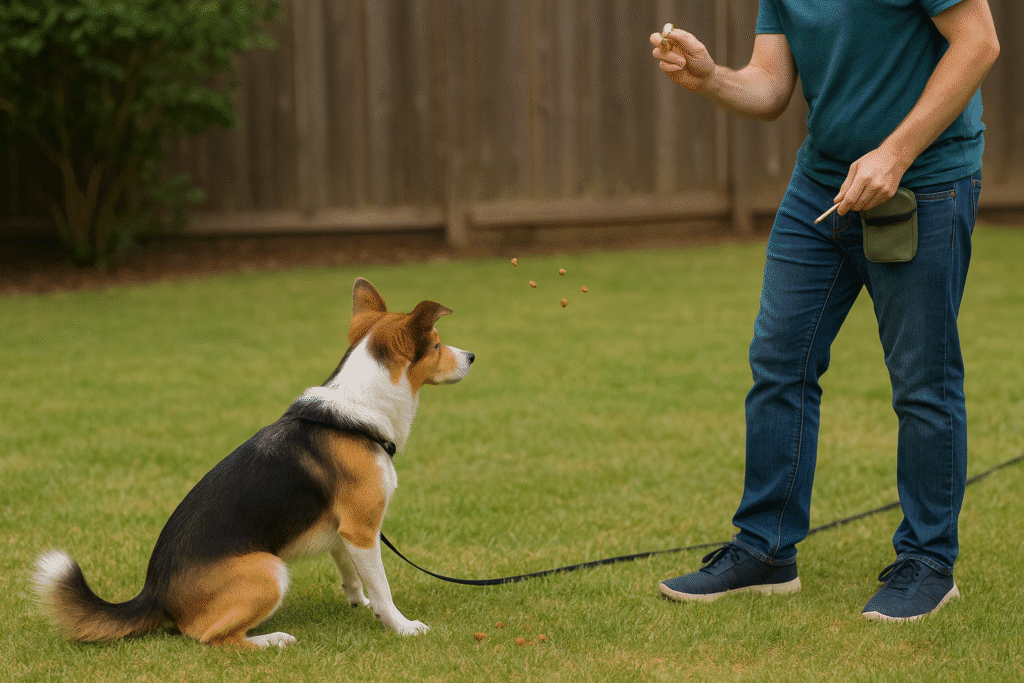
- Give your stop cue (whistle or “Stop!”). Instantly toss 3–4 tiny treats behind your dog so motion flows backward, not forward.
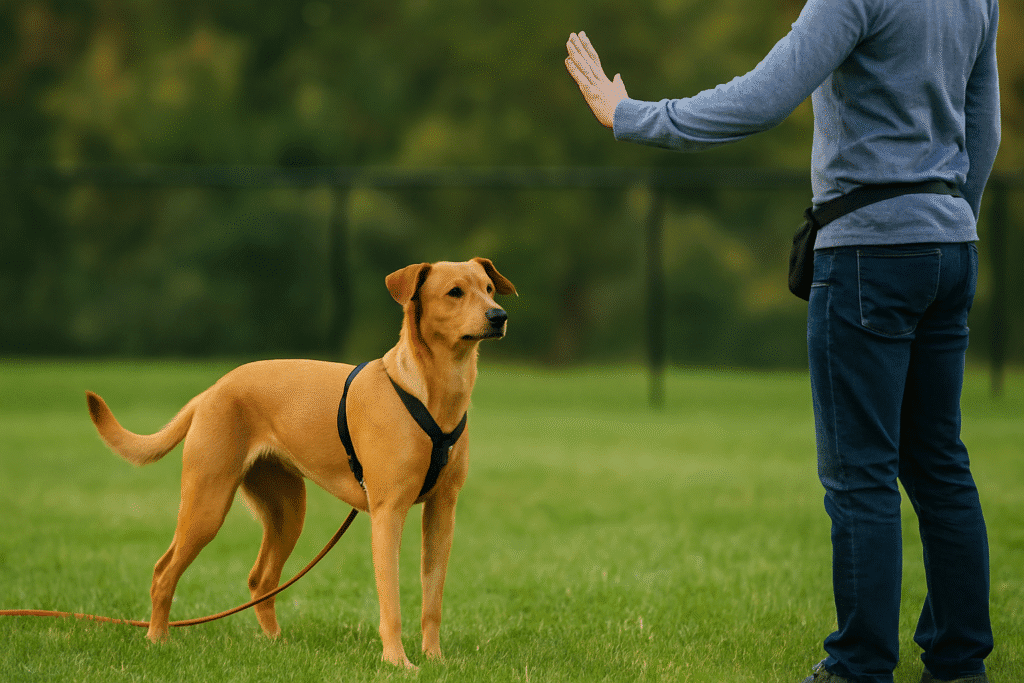
- As your dog swivels to eat, add the hand signal (palm out). Repeat 3–4 times.
Why toss behind? It creates a natural brake. Your dog learns that stopping and turning off forward motion is what pays.
Minutes 2–5: Add a Fast “Freeze” Picture
- Place a shallow food bowl on the floor behind your dog (pre-loaded with a few pieces).
- Walk together at a slow trot for 3–4 steps. Give the stop cue.
- As your dog slows/turns, step in place and point to the bowl behind them. They stop, pivot, and eat. Mark (“Yes!”) the moment feet stop.
- Remove the bowl and repeat from new angles so the pattern generalizes.
Minutes 5–7: Add Distance & the Hand Signal
- With your dog 2–3 m ahead on the long line, give the hand signal first, then your verbal/whistle cue.
- If your dog stalls even slightly, jackpot (5–6 rapid treats to the ground behind them).
- Finish with one perfect, easy rep. Always end while it’s going well.
Week-by-Week Progression (Reliable in Real Life)
Week 1 — Build the Reflex Indoors/Quiet Yard
- Goal: Dog stops within ~1 second from 2–3 m away 8/10 times.
- Games: “Red Light, Treat Light” (walk → stop → treat toss behind), hallway trots, mat-to-mat stops.
Week 2 — Distance & Low Distractions
- Increase distance to 5–8 m on long line; vary your position (side, behind).
- Add simple distractions: stationary toy on the ground, family member walking slowly.
- Reinforce stillness: 1–2 seconds of freeze → release cue (“Free!”) → toss reward behind.
Week 3 — Motion & Moving Distractions
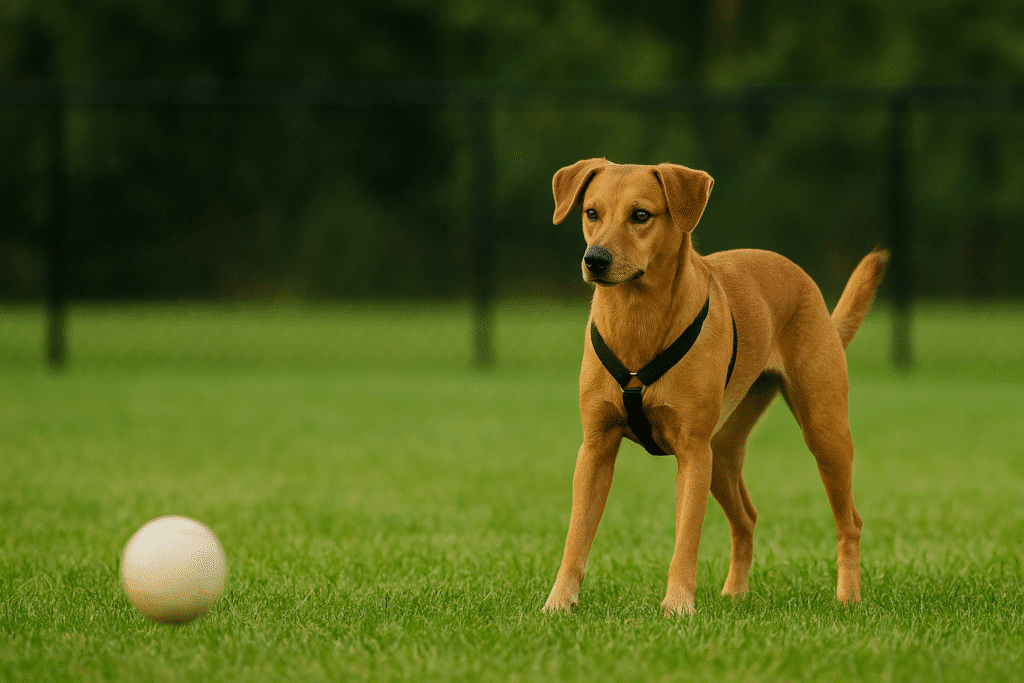
- Introduce moving decoys: rolling ball, person jogging far away.
- Pattern: motion → Stop! → stillness → release → reward behind. Keep arousal low.
- If latency slips (>1.5 s to stop), shorten distance or reduce distraction and win again.
Week 4+ — Field Proofing & Off-Leash Zones
- Practice in fenced fields first. Randomize surfaces (short grass, gravel path).
- Mix cues: sometimes hand signal alone, sometimes whistle alone, sometimes both.
- Pay big for “hard” wins (squirrels in distance, picnic smells). Your bank account for reliability is jackpots.
Handler Habits That Make It Rock-Solid
- Single, clear cue: One stop word or one whistle pattern. Don’t chant.
- Pay the picture: Still feet, eyes flick to you, and no creep forward = big pay.
- Reward behind the dog: Always. It preserves the braking effect.
- Release word: Teach “Free!” to end the freeze so the dog doesn’t self-release.
- Short sessions: Quit while perfect. Reliability grows between sessions.
Fix-It Guide (Common Bumps)
- Dog keeps creeping forward: Toss rewards farther behind. Add a visible target mat behind the dog for 1–2 sessions.
- Slow to respond outdoors: Halve distance, use higher-value food, run one “easy rep” indoors first, then go outside.
- Ignores cue when excited: Your difficulty ladder jumped too fast. Step down: greater distance from distraction, slower setups, heavier reinforcement.
- Spins back to you instead of freezing: Mark the instant the feet stop; release to food behind. If needed, practice against a low barrier to block forward drift.
Distraction Ladder (Print This)
| Level | Distraction | Distance | Advance When |
|---|---|---|---|
| 1 | Empty room | N/A | 8/10 stops ≤1 s |
| 2 | Quiet yard | N/A | 8/10 stops ≤1 s |
| 3 | Toy on ground | 3–4 m | 8/10 clean freezes |
| 4 | Rolling ball | 6–8 m | 8/10 clean freezes |
| 5 | Person walking dog (far) | 20+ m | 8/10 clean freezes |
| 6 | Jogger/bike (far) | 30+ m | 8/10 clean freezes |
| 7 | Squirrels/birds (far) | 40+ m | 8/10 clean freezes |
Rule: If success drops to ~5/10, go back one level and rebuild.
Integrate with Everyday Walks
- On every outing, run 2–3 surprise stops when the leash is slack, then release and continue. Make it a game—keep arousal low.
- At curbs and trail bends, cue a stop before you can’t see ahead. Pay randomly so the dog never knows which stop will earn the jackpot.
- Pair with loose-leash patterns to protect joints and clarity.
Advanced: Two-Cue Safety Net
Once solid, sometimes cue hand signal only; other times cue whistle only. Your dog learns that either means the same behavior. If wind or distance eats the verbal, your hand or whistle still works.
7-Day Mini-Schedule (Copy/Paste)
- Mon: Indoors — 10 stationary cue pairings, 5 short trots → stops.
- Tue: Hallway — 6 trot stops, 4 hand-signal first → cue.
- Wed: Yard (long line) — 8 distance stops (3–5 m), reward behind.
- Thu: Yard — add toy on ground (far), 6 clean freezes.
- Fri: Quiet park edge — 6 distance stops (5–8 m), low distractions.
- Sat: Park edge — 4 moving decoy reps (rolling ball), high jackpots.
- Sun: Review day — easiest wins only, celebrate, no drilling.
When Not to Use It (and What to Do Instead)
- Dog is already sprinting at high speed toward danger: If response isn’t yet bomb-proof, do not test it. Use the long line, increase distance, or body-block safely.
- Dog is over threshold (frantic, fearful): Create distance first; then try. Training works when the brain can learn.
- Pain or medical issues: If behavior suddenly changes, talk to your vet first.
Related Guides (Internal Links)
- Teach “Leave It” in 3 Days — essential for scavenging and impulse control around temptations.
- How to Train a Dog to Walk on a Leash Without Pulling — pairs perfectly with stop drills.
Trusted External Resource
FAQ: Emergency Stop Training
How long until it’s reliable?
Most dogs get a solid indoor stop within a week of 7-minute sessions; field-reliable control typically takes 2–4 more weeks of gentle proofing.
Should I use a specific word or a whistle?
Either works. Whistles cut through wind and distance. If you use a word, keep it crisp and unique (e.g., “Stop!” rather than a common cue).
Why do we toss treats behind the dog?
It reinforces braking and prevents creeping forward. The reward location teaches the picture of stillness.
Can I pair this with recall?
Yes—teach both. Stop prevents reaching danger; recall brings your dog safely to you. Train separately; when both are strong, you can chain: Stop → Release → Come.
What if my dog freezes then breaks position?
Lower difficulty and shorten the freeze to one second. Mark that, pay, then gradually lengthen. Add a clear release word so the dog never guesses.
Call to Action
Run your first 7-minute session tonight: condition the cue, pay behind, finish on a perfect rep. Add two easy stops on tomorrow’s walk, and keep a tiny log. In a few weeks, your emergency stop will feel like a superpower.
- ALT: Dog freezing on cue with handler giving a palm-out stop hand signal on a long line
- ALT: Handler tossing treats behind the dog to reinforce braking during an emergency stop drill
- ALT: Whistle and treat pouch on a bench before distance stop training in a park
- ALT: Dog holding a steady freeze while a ball rolls past at a distance